When we first purchased our homestead in the hollow, we saw the potential, but we also saw that it would take A LOT of work to update this one-of-a-kind farmhouse. The old owner was in construction and purchased the property when all it had was the original 1840’s log cabin (take the tour here) and a one room farmhouse, which is now our living room (take the tour here).
The farmhouse sits next to the creek and in between two hillsides, making it dark and dreary in many of the rooms. The dark and dated colors that the old homeowners used didn’t help any. We have been taking this farmhouse renovation one room at a time. 7 years later, it is now starting to feel like home! Having been a military family for a long time, it was nice to finally plant roots. We still have hundreds of other projects that still need our attention, but it is nice to finally be able to see the rewards we had hoped for.

Making a house a home is hard work and filling it with items you love for the people you love, is just part of the progress for making your spaces special and inviting. Even if we lived close to a bigger city, I would still prefer using creativity and ingenuity to fit our family’s current needs. We save a lot of money by putting our DiY skills to work. Repurposing items and giving them new life by modifying or upgrading is a great way to add your own personal style to your home. I feel like we achieved all this with this fun teen coastal farmhouse bedroom makeover.

Here is what the room looked like during our initial viewing with the realtor. As the old owners were adding to the one room farmhouse, the layout and plans for the home changed several times. This last set up was for their bed and breakfast venture.

When we first moved to the hollow, this room looked like a barracks with two sets of bunkbeds. It worked well for several years as the littles were still little, but once the older two were passed the double digits, we knew that we needed to rethink the configuration of the rooms and give them all spaces to grow.

This was the interim room lay out when the two youngest claimed this space. It is a larger room and for me, it just didn’t feel right. When they made the split, I pictured this room being for the older two because we all know that teen and tweens “need” more space. (smile) It was still a nice space, but it definitely could use some more work.

During this phase, we had moved the bigger kids back into the space and the lay out started to come together. We separated the old bunkbeds that came with the farmhouse when we purchased the property. They weren’t in the best condition, but we made them work with a little TLC. We brought in the bookshelf that my husband made with spare material from an old armoire from our friends. We used it in our family room, homeschool room, and our son’s old room before it found its’ way here as a nightstand.

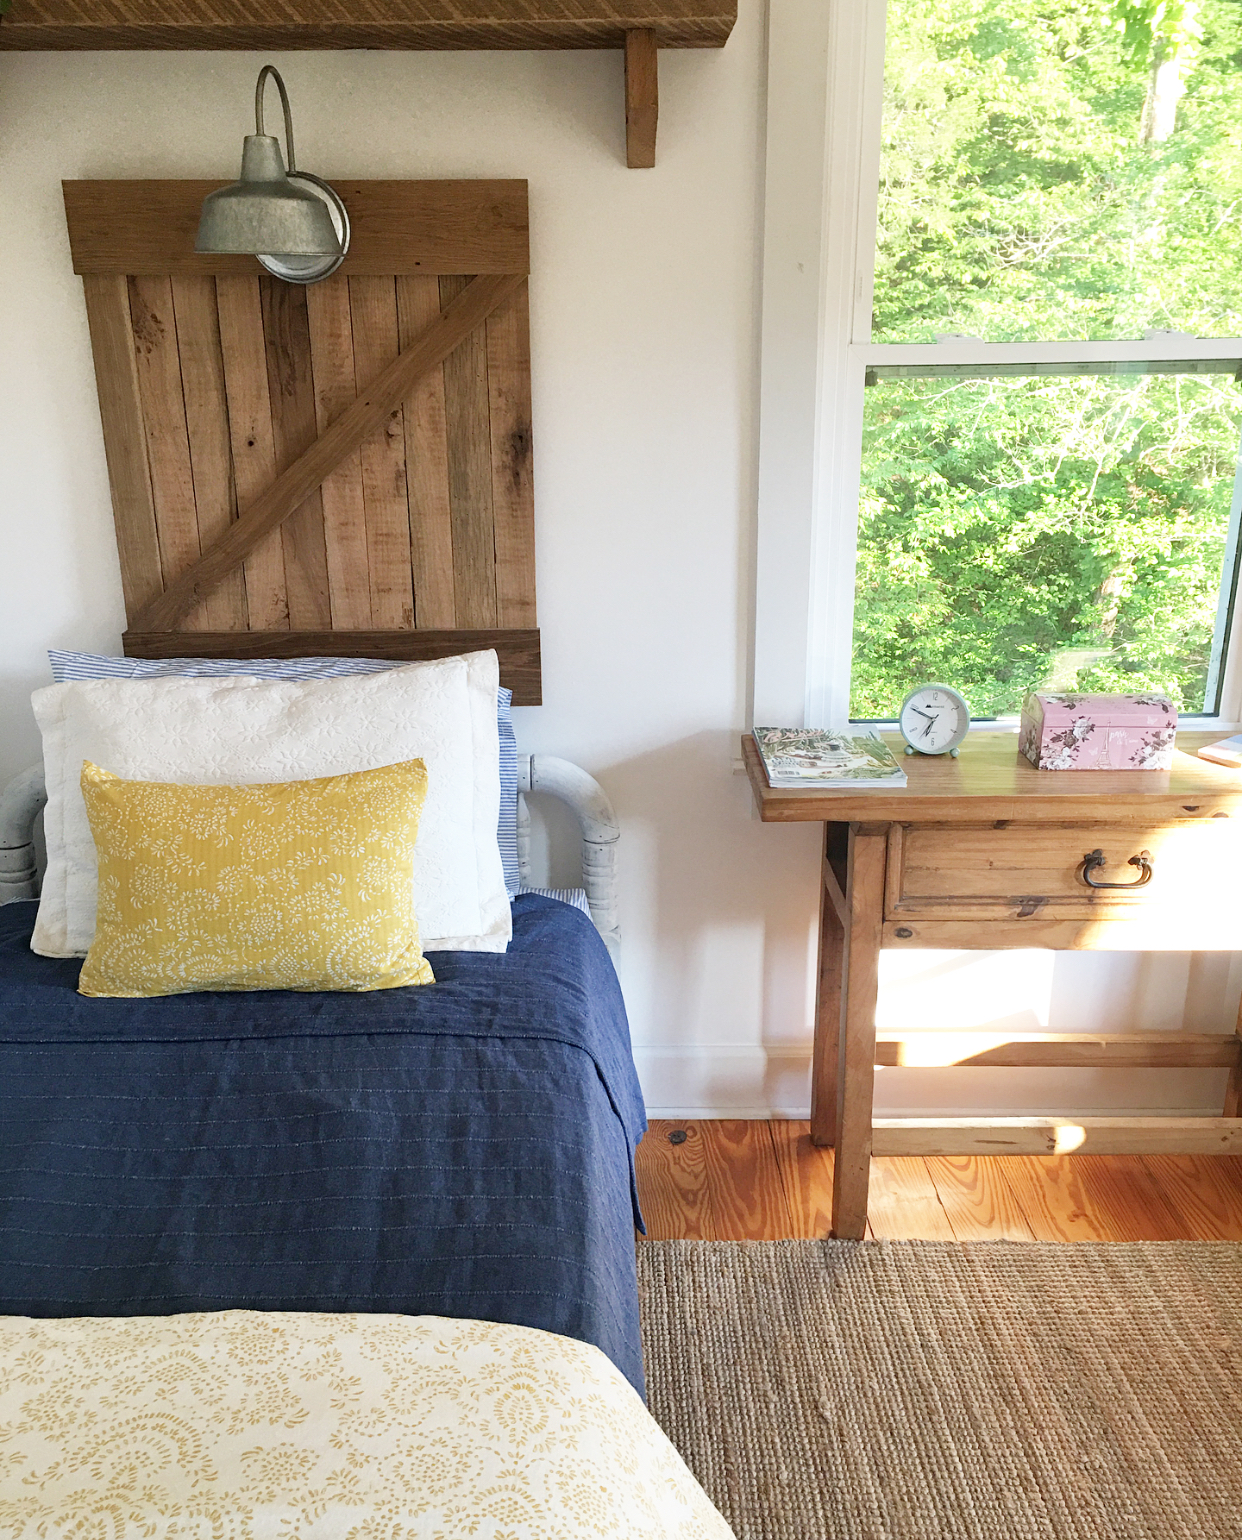
Our whole house is a collected style of things we found along the way and old pieces that we repurposed. We also have a lot of vintage items from my husband’s parents when they downsized their home, 5 years ago. We found this vintage mirror while visiting in Alabama. I had hoped to find a nice antique dresser for this space, but when we came up short, my husband purchased this IKEA dresser when he was in Missouri for work. It fit this space nicely and works well for all their cloths. I purchased some glass knobs that we will be installing in the future to add a little vintage style to this modern piece.

As with all our projects, I wanted to keep our spending to a minimum. One of the best ways we save money on styling our farmhouse is to shop our home before we shop elsewhere. We have gotten really good at taking things we already have and making them better, as you will see with this bedroom makeover. These beds were originally a glossy brown stain, very characteristic of the 70’s. I simply sanded them down and painted them white. I tried to make it look a bit white washed to give it some rustic charm.

The headboards originally had the bunkbed nubs sticking out. We tried to find finials to fit on top, but that was more trouble than it was worth. So, my husband modified the beds by cutting the headboard down to be the new foot board. I still need to paint the raw wood, but it now looks like it was meant to be. He also created a similar version with our old sleigh bed in our master bedroom. Thinking outside the box and having a very handy husband, helps to make our farmhouse feel more unique and less store-bought.

The blue IKEA bedspreads were only $15 and cover the raw wood nicely. The rug was also from IKEA for less than $100 for the larger version. I thought the jute style and rustic color of the rug would work well to pull the beach vibe together on this end of the room.

This whole process took months to complete because we were doing it ourselves and we wanted to be intentional with everything that we did. I partnered with the folks at Behr.com paints to test out their home delivery service. They were a delight to work with and the fact that the paint was delivered right to our door in the country was awesome! I chose the color Polar Bear to brighten up the space.

Since we homeschool, we wanted an area that they could use for their independent study. An old oak table that we had in a previous home was just the right fit when cut in two and stripped down to the bare wood. They turned out fabulously and didn’t cost us a thing. I love how they had two drawers on each side of the table which was said to be used for the family bibles. Now, they hold the girls’ notebooks and bibles for their homeschool lessons. We made the art work above the desks from old canvas pieces from Goodwill. We crumpled up paper and “Modge Podged” it to the canvas and then painted the whole thing with white paint. We used acrylic paint that we already had and painted simple ombre style lines and then blotted it off for a more rustic feel. Once it was dry, I trimmed it all out with some scrap wood.

My husband literally chopped this table in half and reinforced the corners and attached them to the studs in the wall with a board on the underside.

Stripping the homemade chalk paint was easier than I thought it would be. My go-to paint stripper is CitriStrip because it is non-toxic and does not give me headaches when I use it indoors. I still try to leave the windows open to help with ventilation and I use a mask and gloves for extra protection.

We had these two old chairs that were a dark brown stain and had olive green faux velvet cushioned seats, just sitting in my husband’s workshop. I sanded them down and put a couple coats of primer before painting them with trim paint. I recovered them with some ticking fabric that I had from another project. They look brand new in their new spots next to the newly repurposed table, turned desks.


If you look at one of the previous before pictures, you can see that even the DiY nightstand got a simple makeover. I asked my husband to make it a little shorter and to make the lines more straight to go with the more modern feel the kids’ were looking for. I sanded and primed the piece and then used some Miss Mustard Seed milk paint that I already had to give it a nice blue color. I purposefully let the white primer show through in spots to add to the casual beachy feel. It is amazing how different it looks now!

Previously, we had my mother-in-law’s old hurricane-type lamps with milk glass on this dresser, but I thought these faux wood base lamps from Target went better with the new vibe of the room. We purchased the lamp shades from our local Lowe’s Home Improvement store.

Using the foot board as the head board created a lower profile, leaving a large blank wall that needed something. Since our children love to read in bed, I have always wanted to give them their own reading lights for above their beds. My husband built this old wooden barn door from scrap wood and added these galvanized outdoor light fixtures to fill the space. The old DiY shelves that he built for the front room several years ago ties in nicely with the rustic warn look. I love the way it all came together!
Having this teen/tween room complete makes all the hard work worth it. Not to mention that our daughters appreciate their new and improved space. What do you think? How do you like the new fresh look? Does it speak summer to you too?

**This post may contain affiliate links. Please see full affiliate disclosure here.
Note: Purchasing through any of my blog links and/or side bar buttons, helps to keep this blog running. All reviews and opinions of any items shared on GracefullyHome.com are of my own opinion and are not swayed by sponsorship or collaborations. Please keep in mind that I only share products or services that my own family have found helpful and healthful with those who visit my blog. Thank you for your support and for continuing to follow along!


Loves all of this! So gifted and inspiring!
Thank you so much, Valerie for stopping by and leaving a kind comment. Our big kids have really enjoyed their bright new space and can’t wait to start the new homeschool year with their new desks and work space.