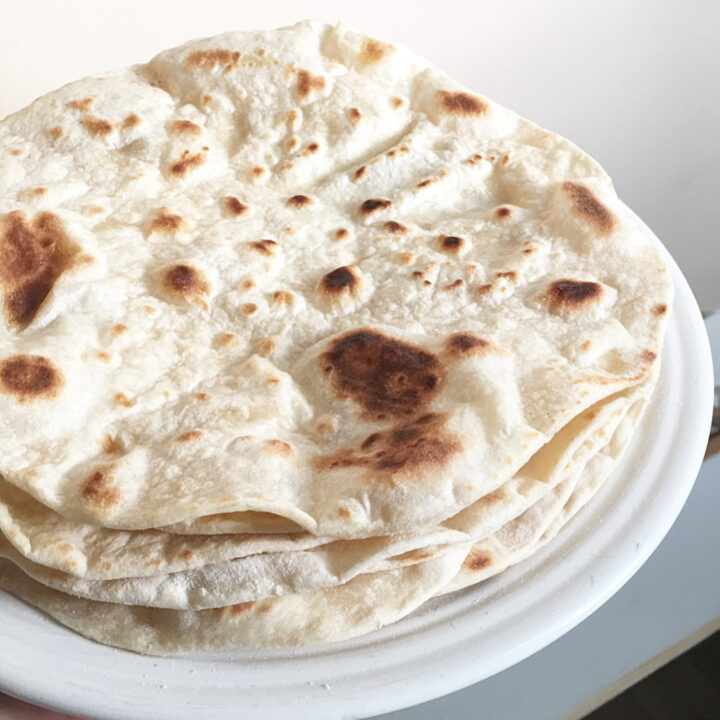
Learn how to make easy flour tortillas at home. These tortillas are soft and chewy and only need four ingredients to make. They are great with your traditional fajita or burrito meals, but can also be paired with other meats and sauces for a more Mediterranean flare.

This recipe share has been a long time coming! My cell phone is full to the max on photos for blog posts that need to be shared.
As a result, I am finally sharing this family favorite recipe with you today.
A funny thing happens when you have littles, you homeschool, homestead, and you decide to extend summer vacation into fall.
Your work schedule gets all mixed up and lots of things get put on the back burner.
I’m going out on a limb here and guessing that you may know what I’m talking about. Am I right?!
GREAT FOR BEGINNERS
We started making these simple tortillas early on in our marriage. These couldn’t get any simpler.
Once you give homemade flour tortillas a try, you may never go back to store bought again.
OK, maybe just in a pinch, when you’re on vacation, or when you have a large group of people coming over.
But seriously, easy flour tortillas at home are such a delicious and simple version.
Our littles always say that they love our homemade version better than store bought. That’s always nice to hear!
**This post contains affiliate links. Please see full affiliate disclosure here.
SUPPLIES AND TOOLS YOU MAY NEED
- mixing bowl
- measuring cups and spoons
- clean hand towel
- mixing spatula or wooden spoon
- cast iron skillet
HOW TO MAKE EASY FLOUR TORTILLAS AT HOME

Easy Flour Tortillas at Home
These tortillas are soft and chewy and only need four ingredients to make. They are great with your traditional fajita or burrito meals, but can also be paired with other meats and sauces for a more Mediterranean flare.
Ingredients
- 3c unbleached all-purpose flour
- 1/3c avocado oil (extra virgin olive oil will do in a pinch or if that is all you have on hand)
- 1 tsp of Himalayan Pink Sea Salt or Celtic Sea Salt
- 1 cup warm water (warm in a small sauce pan)
Instructions
- Place the flour in a large mixing bowl.
- Add the oil and combine with a fork or your clean hands to form the consistency of coarse corn meal.
- Place salt in the cup of warm water and mix until dissolved thoroughly.
Combine dry and wet ingredients together with hands and knead until the dough is smooth, springy, and no longer sticky, about 3-5 minutes. - Form a ball and place back in the bowl. Cover with a clean dish towel and let rest for a minimum of 30 mins.
- When the dough is ready, pull off a palm-size ball and need into a small circle with your thumbs. Make sure to recover the dough bowl with the dish towel to prevent from drying out in between making each tortilla.
- Then place on a clean floured counter or baking sheet and roll out with a rolling pin. Sizes will vary depending on how big or small your initial ball was. I like to use a standard sized plate as a reference.
- Once the first tortilla is rolled out, place your cast iron skillet on the burner on medium to medium high. Temps will vary with your specific brand and burner settings. It doesn't take long to warm up.
- Place your first tortilla in the pan and watch carefully. It browns quickly so you don't want to get distracted and let it burn.
- Once the top starts to bubble up, you can flip the tortilla over for another minute to 2 minutes. The less time you leave it on the heat, the chewier and more flexible it will be which makes it easier to use for making burritos or soft tacos.
- Remove from heat with tongs and place on a plate, then cover with another clean dish towel to hold in the heat and prevent drying out.
- Continue the process until all the dough is formed into your tortillas. This recipe makes about 12-15 tortillas with the size I mentioned above.
- Last step is to sit back and enjoy the smiles and giggles as your family enjoys your newest creation.
Notes
Serve with chopped veggies, cilantro, onions, diced chicken, or grass-fed ground beef seasoned with your favorite Mexican spices. I like to add beans, sweet corn, and bell peppers for an even more delicious flavor.
ADDED FLAVOR
Serve with chopped veggies, cilantro, onions, diced chicken, or grass-fed ground beef seasoned with your favorite Mexican spices.
I like to add beans, sweet corn, and bell peppers for an even more delicious flavor. Don’t forget the organic sour cream and homemade pico!
PIN IT FOR LATER:

SIMPLE AND VERSATILE
These don’t take long to make and are great with traditional fajita or burrito meals. But can also be paired with lamb and grass-fed beef meatballs, fresh veggies, and some homemade Taziki sauce to make more of a Mediterranean dish; like a gyro.
Just use this same recipe, but avoid rolling too flat like regular tortillas.
Another option is to use these for easy wraps for a quick lunch.
Our littles also enjoy just eating them without any kind of filling, but we try to avoid that and have them eat the good stuff along with it.
It’s all about balance, right? Hope you’ll have a new family favorite in your home as you give this easy flour tortillas at home recipe a try.
Do you have a favorite tortilla recipe that you love?


Leave a Reply