Learn how to make a probiotic-rich drink at home with this simple homemade water kefir soda recipe. If you are trying to eliminate store-bought soda from your kiddos’ diet, this may be the healthy alternative that you are looking for.

BENEFITS OF FERMENTED FOODS
Learning how to ferment and culture food at home may sound intimidating, but once you give it a try, you will see just how easy it really is. And the rewards from the benefits of getting extra good bacteria in your gut is so worth the time you invest in it, today.
They don’t call your gut, “your second brain” for nothing. Prevention is KEY! Most common diseases we see today don’t start overnight. They are caused and shaped by a lifetime of choices and the environment we choose to live in.
The practical life skills that our littles learn today, will shape who they are in the future and whether they thrive or find themselves chronically sick. Start them young and teach them how to make healthier choices today.
“An ounce of prevention is worth a pound of cure.”
~Benjamin Franklin
GUT HEALTH SUPPORT
In addition to taking our powerful probiotic blend supplement found here, we make sure that our family eats a healthy variety of nutrient dense whole foods and we love to take advantage of the outdoors with hikes and nature walks to explore our property.
We make sleep a priority, drink plenty of water, and for the adults, we try to manage our stress levels by knowing our limits and training ourselves to say, “No” when we have too much already on our plates. We don’t always succeed in these areas, but it is a daily choice we try to practice.
BUILDING A STRONG IMMUNE SYSTEM
Lately, I have been getting more questions about how our family likes to combat the flu season and the newest scare with the spread of the Coronavirus.
It’s easy to say that those with weakened or compromised immune systems are the ones that may be more seriously affected, but that doesn’t mean that if you are young, eat healthy, and exercise regularly that you shouldn’t take precautions.
The most important thing you can do for your family is help build a strong and healthy immune system naturally with the daily choices that you make.
**This post may contain affiliate links. Read my full disclosure here.
NATURAL IMMUNE BOOST
Making probiotic products at home can save you money and can help give your gut eco system a diverse variety of different strains of good bacteria to help rebuild and support a healthy and strong immune system.
Fermented and cultured foods and beverages have been around for thousands of years and they have been slowly creeping their way back into our modern-day homesteading kitchens and natural living communities.
INGREDIENTS & SUPPLIES YOU WILL NEED
-Water kefir grains here.
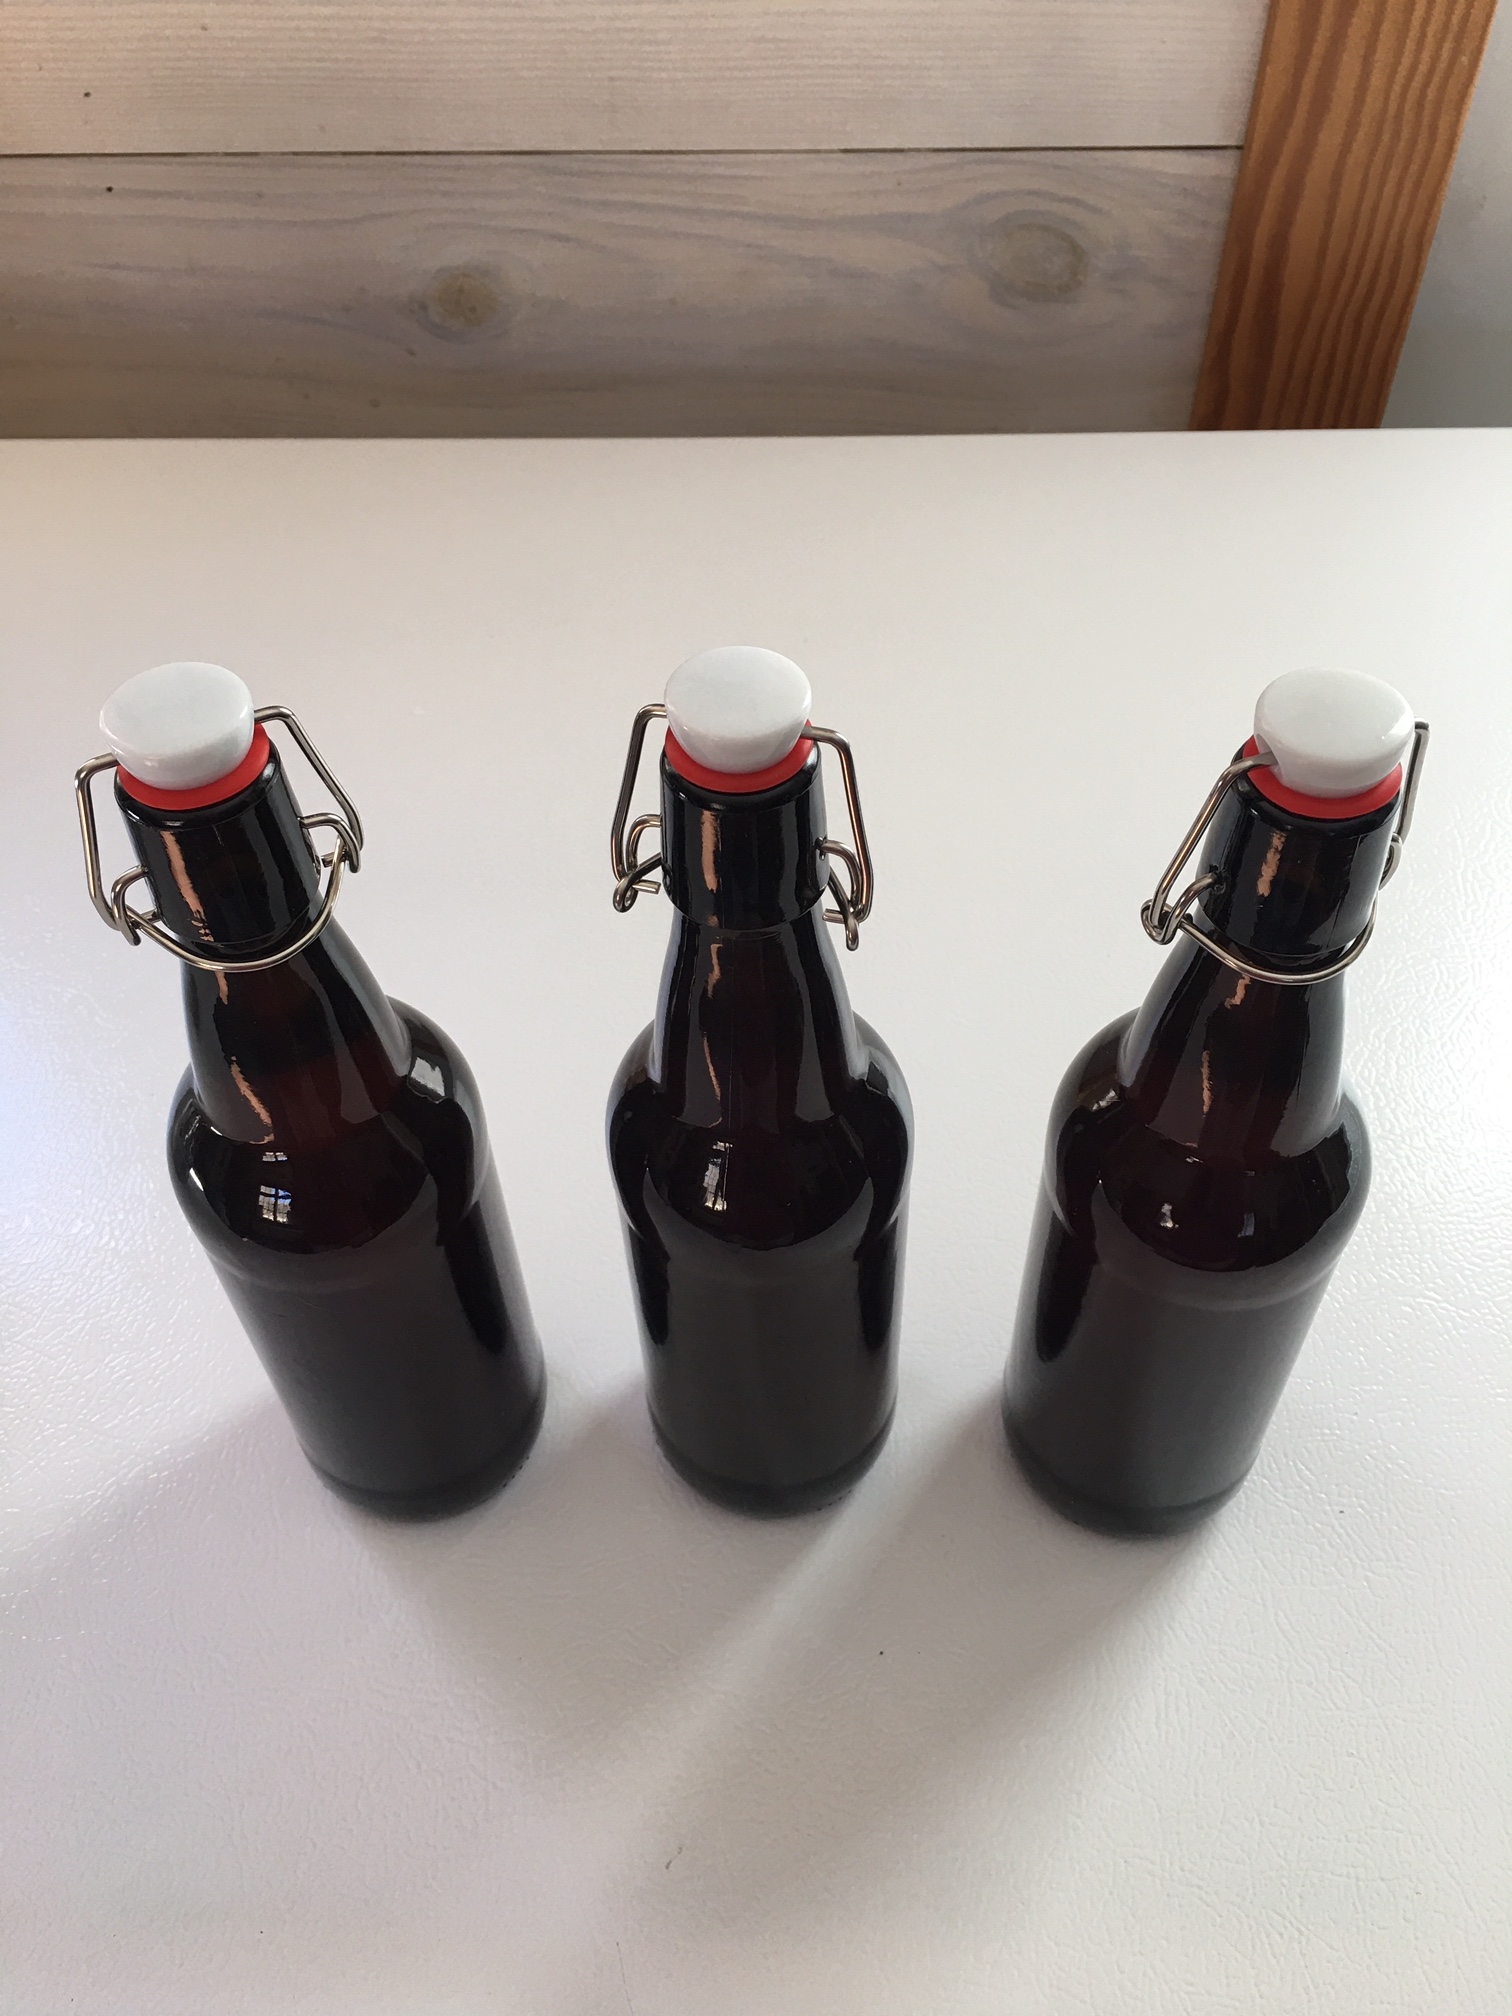
-These 16 oz Grolsch Glass Beer Bottles for second fermentation here.
-Organic pure cane sugar (you can also use organic brown sugar, but stay away from using sugar substitutes or honey because they have properties that may kill your live cultures)
-Organic molasses unsulphured (optional)
-Fine mesh strainer like this here.
-4 cup glass measuring cup like this here.
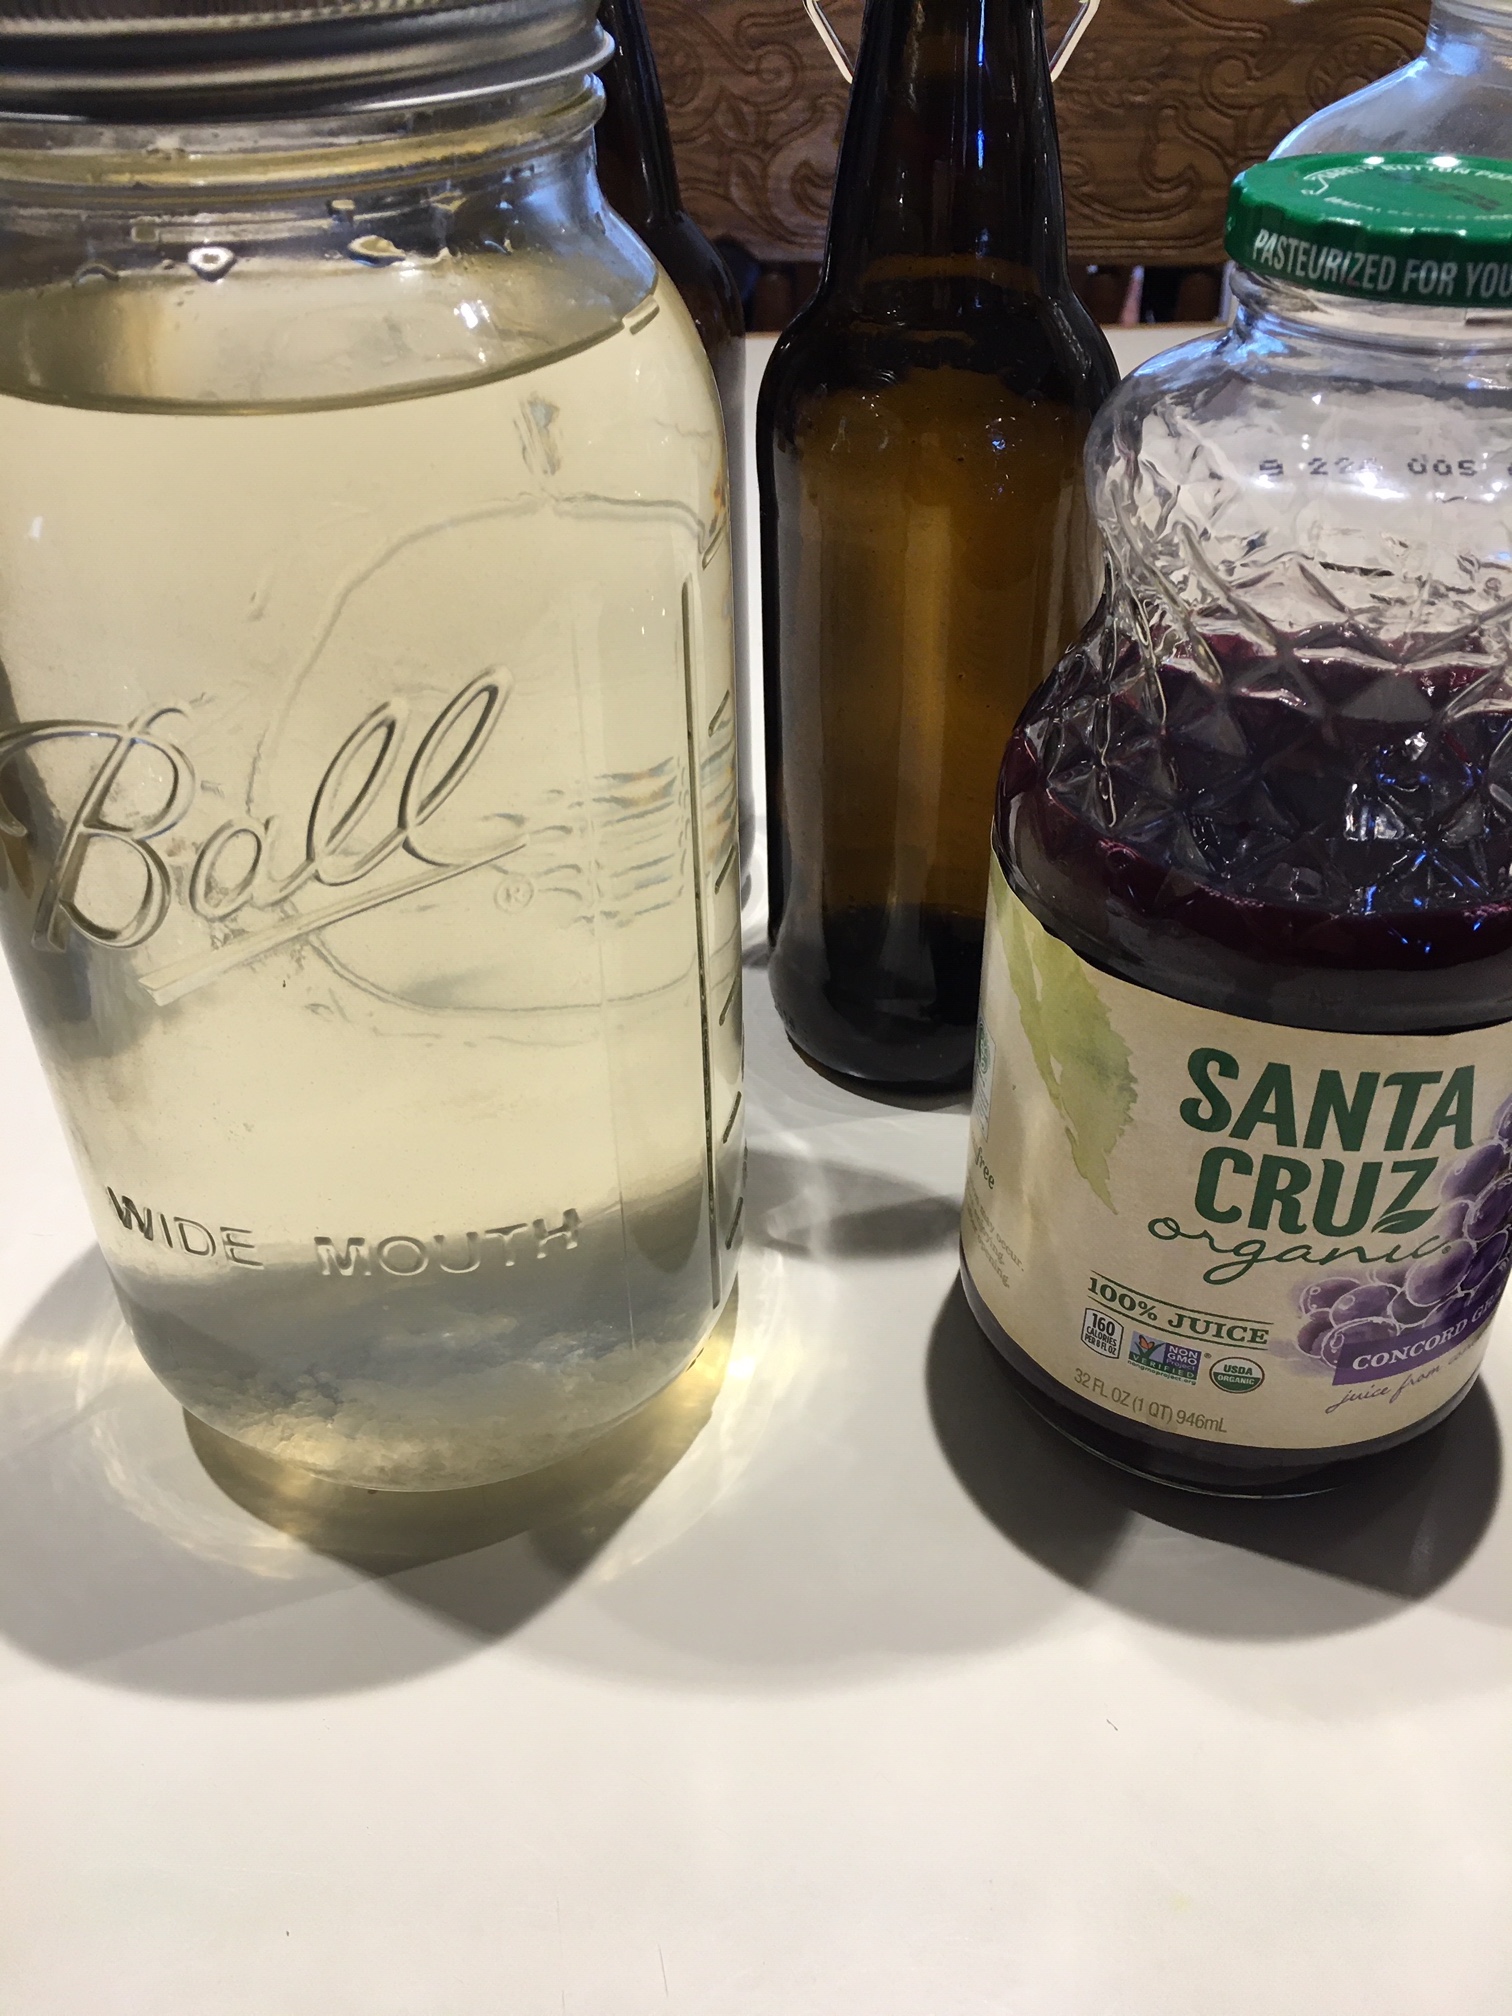
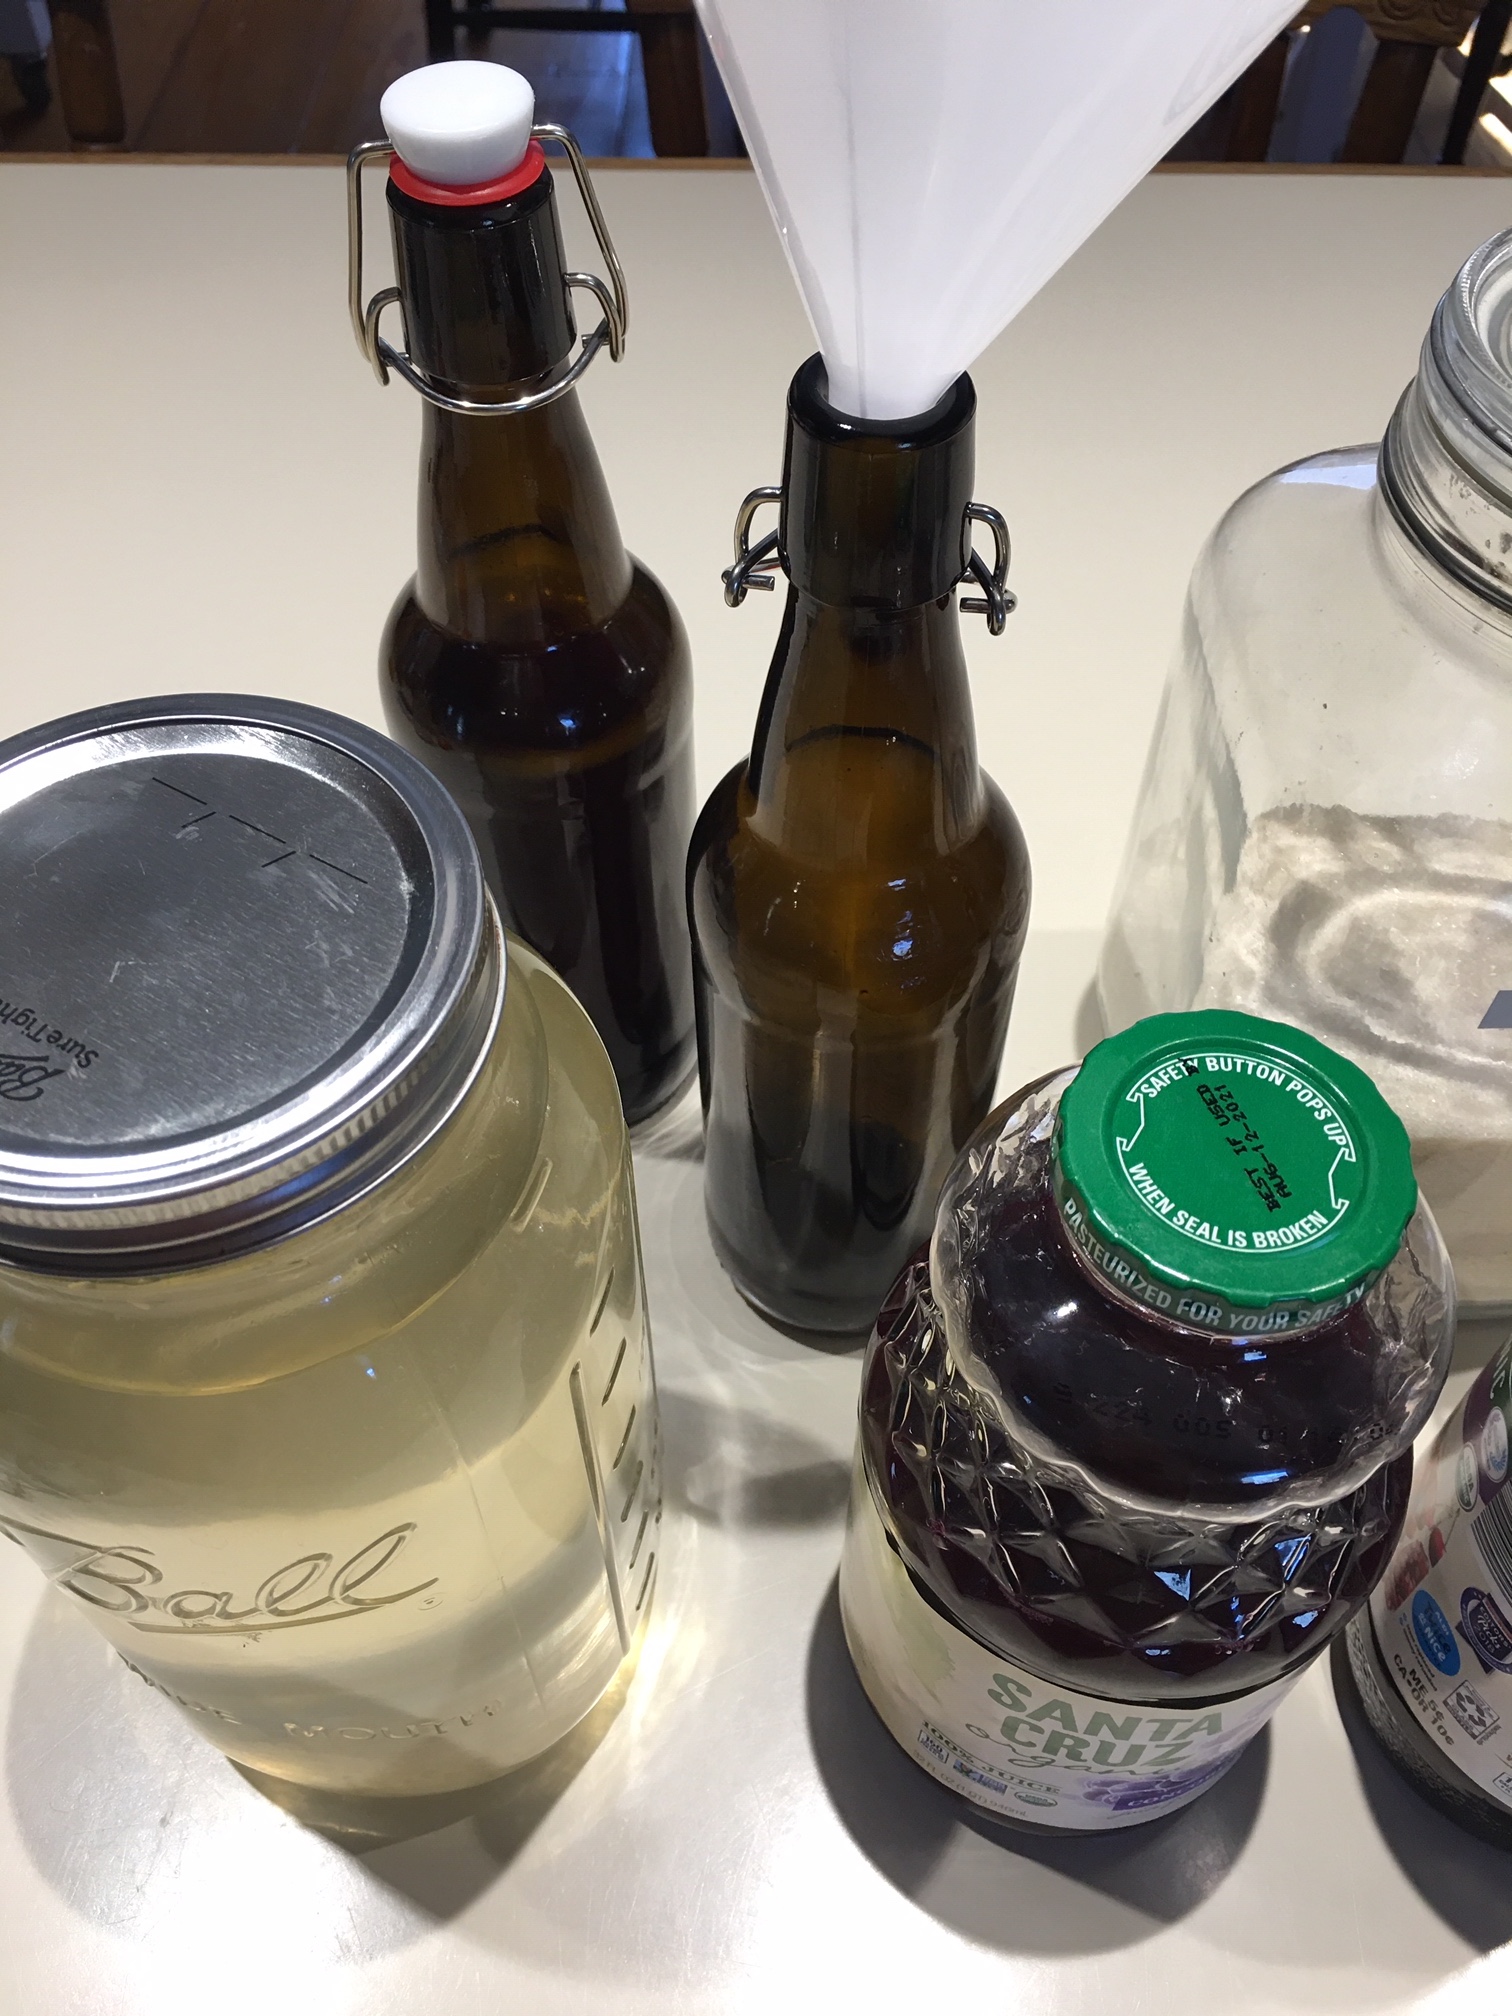
-64 0z size mason jar (purchased ours at the local grocery store for canning and storing leftovers, but you can also find them here)
-Mason jar lid.
-Plastic funnel like this here.
-Organic grape juice (purchased ours at our local grocery store)
-Wooden spoon to mix sugar solution.

WHAT IS WATER KEFIR?
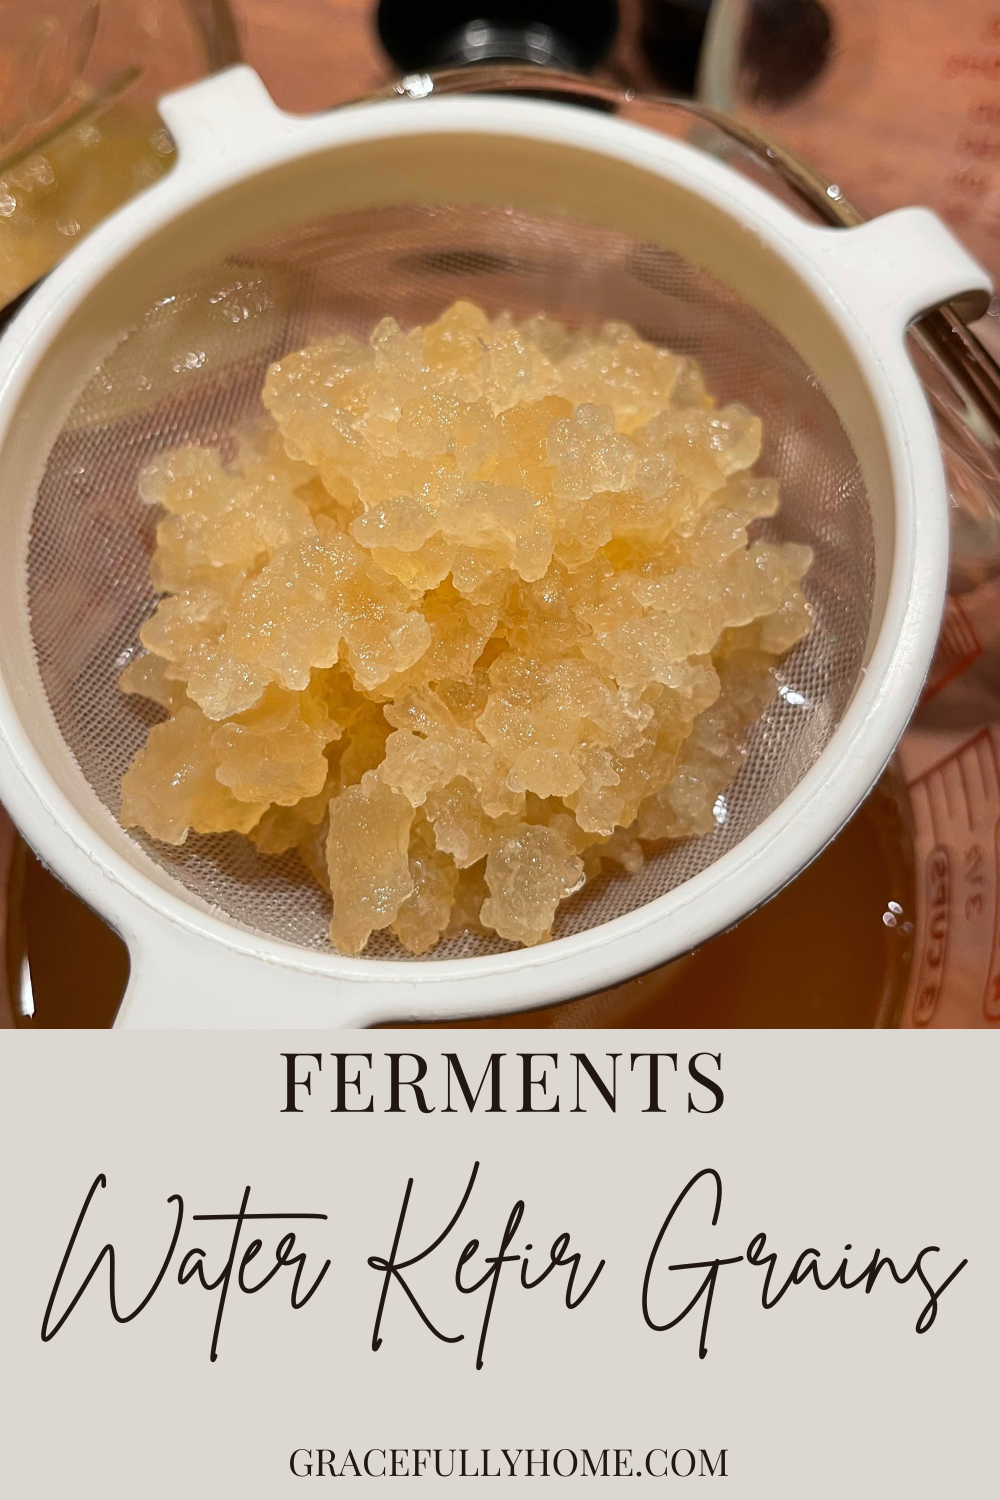
This is what the water kefir grains look like. They are a gelatinous colony of good bacteria and yeast that feed off of sugar.
You may be thinking, “Isn’t sugar bad for us?”
In highly processed forms and in high amounts, sugar can be unhealthy and cause chronic inflammation in the body, which in turn can make you more susceptible to chronic disease and illness…even cancer, but in this case, the water kefir grains consume the sugar and produce healthy bacteria growth to help build a healthy gut environment.
The result, is a healthy homemade probiotic soda that the whole family can enjoy.
**This post may contain affiliate links. Please see full affiliate disclosure here.
STEP ONE
Dissolve 3T of pure cane sugar in a quart-sized Mason jar. Lately, I have also been adding a tablespoon of organic molasses to give the grains even more food to feast on.
Adding the tablespoon of molasses really helps to speed the fermentation process along and provides the grains a great catalyst for multiplying these beneficial kefir grains.
For a gallon jar, add 1/2 c sugar in natural spring water. I used to use filtered water and then discovered that the grains do better with natural minerals from spring water.
We make about 3-4 bottles at a time of the kefir soda. We use a rotating system and usually have a couple bottles in the fridge to enjoy.
NOTE: Some folks will warm up their water just enough to help the sugar dissolve easier. If you choose to take this route, just make sure that your water is not too hot. If you choose to just use straight water without warming, it should be room temperature as to not shock the healthy “good guys.”
Remember that these cultures are living and need the right kind of care to keep them thriving and growing.
STEP TWO
Once the sugar has had enough time to dissolve and the water is at room temperature, add the water kefir grains to the sugar water and place lid on loosely or place a coffee filter on top and secure with a rubber band.
Place the jar on the counter and allow to ferment at room temperature for 24-48 hours.
After the initial fermentation process is complete, give it a taste. The mixture should taste more sour or tangy than sweet, once the grains have consumed all the sugar.
Depending on your grains, this may be up to a three day process. This is not an exact science because there are so many variables from home to home and from water kefir grains to water kefir grains.

NOTE: The warmer the room temperature, the faster the fermentation process. The colder the room temperature, the slower the fermentation process. The more active water kefir grains the faster the fermentation process. The smaller amount of active water kefir grains, the slower the process. Keep this in mind as you experiment with your first few batches.

After the first fermentation process, strain grains with a mesh strainer and set aside for the next batch.
You can drink it as-is or you can put it through a second fermentation process to give it some natural fizz.
A second fermentation process is totally optional, but the second fermentation process gives it the “soda-like” carbonation that our littles have come to love during the summer months.
STEP THREE
If you are wanting to create that extra carbonation type of drink, pour your strained water kefir from your initial batch into each long neck bottle. Make sure to leave space for the added juice. Using a small funnel, add 1/4 c-1/2c of organic grape juice.
You can also use other fruit juice flavors. We have made them with homemade ginger tea to give it a ginger ale flavor. We also enjoy the pomegranate version, but skies are the limits when it comes to flavor combinations.
Making a citrus kefir soda would be so refreshing during those hot summer months. Adding a blend of lemon and strawberries makes a delicious pink lemonade. Our kids like to blend up the strawberry in our Vitamin blender and make a slushy-like drink.
STEP FOUR
After adding the juice, fill the rest of the bottle with additional fermented water kefir.
Leave a bit of head space at the top of the bottle to make space for the expansion of gases.
Close top and leave on counter for an additional 24-48 hrs. I like to give it a gently side to side shake before placing it on the counter to start the process.
Check your bottles by carefully “burping” them (slowly open bottle), if there is a lot of gas, continue to release and then recap and place in fridge to enjoy cold. If not a lot of gas releases, recap and ferment for an additional day, burping at least one to two more times and then store in fridge.
NOTE: If you do not hear any carbonation when “burping” the bottle, recap and leave on the counter for another 24 hrs to ferment a little longer.
I like to use a dry erase marker and mark the top of my long neck bottles with the number 1 for the additional fermentation process and number 2 for the second day.
Keep in mind, that after you add the grape juice, you can ferment the water kefir two more days to maximize its fizziness.
PRACTICAL TIP
Be careful when checking the carbonation levels. The built up gases can make a mess if you’re not careful.
Once the desired carbonation level is achieved, place bottle in the fridge and enjoy over ice or straight out of the bottle.
This homemade water kefir grape soda makes for a refreshing beverage during the warmer months. Our littles absolutely love drinking homemade water kefir soda. The fizzier, the better.
STEP FIVE
Take your original mason jar and fill with water and 3 tablespoons (for a quart jar) to 1/2 c (for a gallon-sized jar) of organic pure cane sugar to start the process all over again.

Simple Homemade Water Kefir Soda
Learn how to make a probiotic rich drink at home with. this simple homemade water kefir soda recipe. If you are trying to element store-bought soda from your kiddos' diet, this may be the healthy alternative that you are looking for.
Ingredients
- Water kefir grains
- Spring water
- Pure cane sugar
- Organic molasses (optional)
- Organic grape juice
Instructions
- Dissolve 3T of pure cane sugar into a quart-sized Mason jar. Lately, I have also been adding a tablespoon of organic molasses to give the grains even more food to feast on.
- Once the sugar has had enough time to dissolve and the water is at room temperature, add the water kefir grains to the sugar water and place lid on loosely or place a coffee filter on top and secure with a rubber band.
- Place the jar on the counter and allow to ferment at room temperature for 24-48 hours.
- After the first fermentation process, strain grains with a mesh strainer and set aside for the next batch.
- A second fermentation process is totally optional, but the second fermentation process gives it the “soda-like” carbonation that our littles have come to love during the summer months.
- To each long neck bottle, add 1/4 c-1/2c of organic grape juice. You can also use other fruit juice flavors. We have made them with homemade ginger tea to give it a ginger ale flavor.
- After adding the juice, fill the rest of the bottle with additional fermented water kefir. Leave a bit of head space at the top of the bottle to make space for the expansion of gases.
- Close top and leave on counter for an additional 24-48 hrs. I like to give it a gently side to side shake before placing it on the counter to start the process.
- Check your bottles by carefully "burping" them (slowly open bottle), if there is a lot of gas, continue to release and then recap and place in fridge to enjoy cold. If not a lot of gas releases, recap and ferment for an additional day, burping at least one to two more times and then store in fridge.
- Take your original mason jar and fill with water and 3 tablespoons (for a quart jar) to 1/2 c (for a gallon-sized jar) of organic pure cane sugar to start the process all over again.
Notes
- If you do not hear any carbonation when “burping” the bottle, recap and leave on the counter for another 24 hrs to ferment a little longer. I like to use a dry erase marker and mark the top of my long neck bottles with the number 1 for the additional fermentation process and number 2 for the second day.
- Be careful when checking the carbonation levels. The built up gases can make a mess if you’re not careful.
PIN IT FOR LATER:
WHAT TO DO WITH YOUR GRAINS WHEN YOU WANT A BREAK
If you need to give your grains a break. You can feed them and place the jar in the fridge for up to 3 weeks.
When you are ready to use again, feed the grains some fresh sugar water and continue the culturing process.
It may take a couple batches for the grains to wake up and start working again, but once they wake up, they get right to work. (smile)

Disclaimer: The health and wellness posts shared here on GracefullyHome.com are not intended to diagnose, treat, prevent or cure any illness or disease. The information provided on this blog is for general educational purposes, has not been reviewed nor approved by the FDA and is not intended to take the place of advice from your medical professional, licensed dietician or nutritionist.
You are solely responsible for your health care and activity choices. Use of any of the recommendations or helpful tools and tips on the GracefullyHome.com blog does not constitute a client-coach relationship.


Leave a Reply